01 - Layouts
View
This class represents the basic building block for user interface components. A View occupies a rectangular area on the screen and is responsible for drawing and event handling. Any other UI components (eg: buttons, text fields, etc) are extentions of the View.
Views also respond to user actions. For instance, when a user taps a button (which is a View), the event is handled in the View. If you want to trigger something when the user taps a button, the View is also exposing listeners (callbacks) for such events.
Layouts
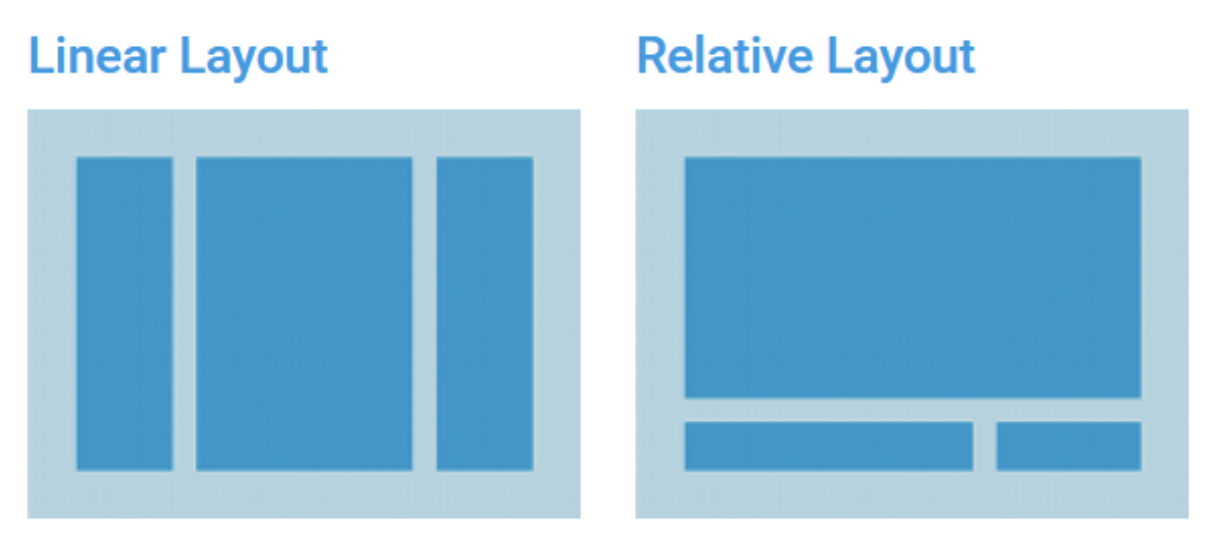
In Android, layouts are used to define the structure and arrangement of the user interface (UI) elements on the screen. A layout is a container that holds UI components like buttons, text views, and images. It organizes these components either in a specific arrangement or based on user-defined constraints. Android provides several types of layouts, each with a different method for positioning UI elements. Some examples are: Linear Layout, Relative Layout, Grid Layout, Constraint Layout.

Linear layout
Arranges its children in a single row (horizontal) or column (vertical). It creates a scrollbar if the length of the window exceeds the length of the screen.
Example
<LinearLayout xmlns:android="http://schemas.android.com/apk/res/android"
   android:layout_width="match_parent"
   android:layout_height="match_parent"
   android:paddingLeft="16dp"
   android:paddingRight="16dp"
   android:orientation="horizontal"
   android:gravity="center">

   <!-- Include other widget or layout tags here. These are considered
           "child views" or "children" of the linear layout -->

 </LinearLayout>
Width and Height attributes
Attributes android:layout_height and android:layout_width are used to specify the size of an element. This attributes are required for any view inside of a containing layout manager. Their value may be a fixed dimension (such as "12dp") for a constant size or one of the special constants from the table below.
match_parent | Will force the view to expand to take up as much space as is available within the layout element it's been placed in (its parent), minus the parent's padding, if any. |
wrap_content | The view wll be large enough to fit its own internal content, taking its own padding into account. |
Specific attributes for LinearLayout
android:orientation | used to specify whether the child views are displayed in a column or in a row |
android:gravity | specifies how an object should position its content, on both the X and Y axes, within its own bounds |
android:layout_weight | Indicates how much of the extra space in the LinearLayout is allocated to the view associated with these LayoutParams. |
Button
A user interface element the user can tap or click to perform an action.
Example
 <Button
     android:id="@+id/first_button"
     android:layout_height="wrap_content"
     android:layout_width="wrap_content"
     android:text="@string/self_destruct" />
class MainActivity : AppCompatActivity() {
    private lateinit var first_button: Button;
    private lateinit var second_button: Button;

    override fun onCreate(savedInstanceState: Bundle?) {
        super.onCreate(savedInstanceState)
        setContentView(R.layout.activity_main)

        // First method of adding a click listener
        first_button = findViewById(R.id.first_button);
        first_button.setOnClickListener {
            val toast = Toast.makeText(this, "Hello World!", Toast.LENGTH_LONG);
            toast.show();
        }

        // Second method of adding a click listener
        second_button = findViewById(R.id.second_button);
        val listener = object: View.OnClickListener {
            override fun onClick(p0: View?) {
                val toast = Toast.makeText(this@MainActivity, "Hello World!", Toast.LENGTH_LONG);
                toast.show();
            }
        }
        second_button.setOnClickListener(listener)
    }
}
Radio Button
Radio buttons let the user select one option from a set of mutually exclusive options
Example
<?xml version="1.0" encoding="utf-8"?>
<RadioGroup
    android:layout_width="match_parent"
    android:layout_height="wrap_content"
    android:orientation="vertical">
    <RadioButton android:id="@+id/radio_pirates"
        android:layout_width="wrap_content"
        android:layout_height="wrap_content"
        android:text="Pirates"/>
    <RadioButton android:id="@+id/radio_ninjas"
        android:layout_width="wrap_content"
        android:layout_height="wrap_content"
        android:text="Ninjas"/>
</RadioGroup>
findViewById<RadioButton>(R.id.radio_pirates).setOnCheckedChangeListener { buttonView, isChecked ->
    Log.d("RADIO", "Pirates is checked: $isChecked")
}

findViewById<RadioButton>(R.id.radio_ninjas).setOnCheckedChangeListener { buttonView, isChecked ->
    Log.d("RADIO", "Ninjas is checked: $isChecked")
}
Project structure


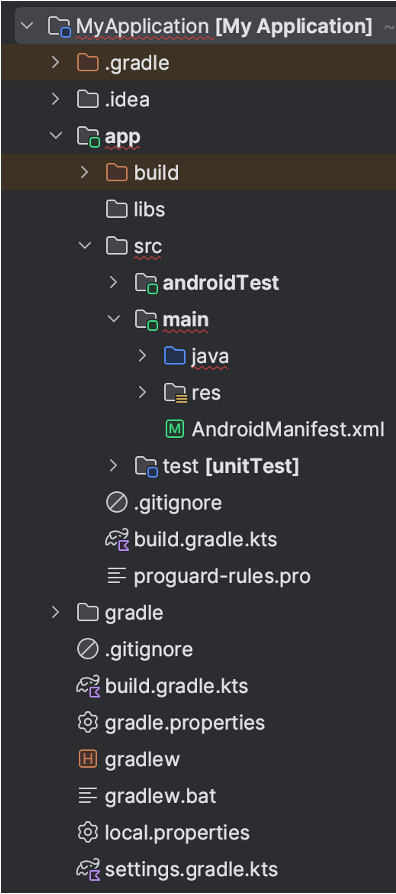
- app/
- src/: The source code folder.
- main/: This is the main source set for your app. It contains both your Java/Kotlin code and resources.
-
java/: Contains all the Kotlin or Java source files for your app. This is where your Activity, ViewModel, and other classes go.
Example: com.example.myapp.MainActivity.kt (for Kotlin) or MainActivity.java (for Java).
-
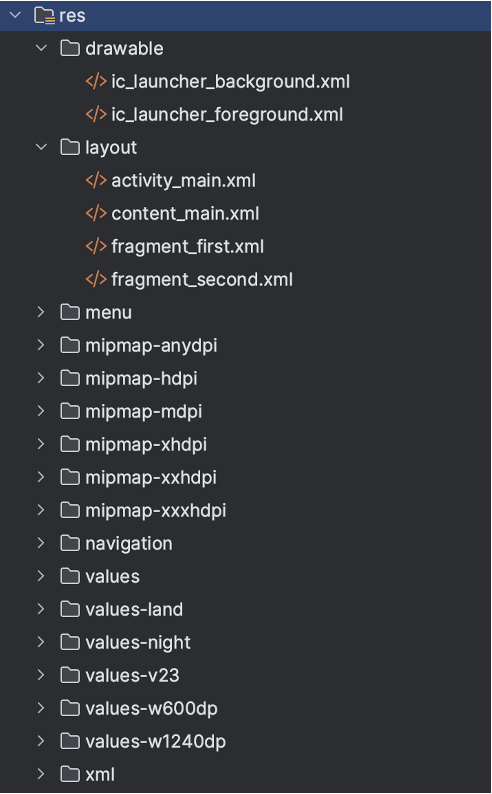
res/: This directory contains all non-code resources (like images, layouts, strings, etc.). Subfolders include:
-
layout/: XML files that define the layout of your activities and fragments (UI elements).
Example: activity_main.xml
-
drawable/: Image files (PNG, JPEG, SVG), vector drawables, and other graphics.
-
values/: XML files that contain constant values like strings (strings.xml), dimensions (dimens.xml), colors (colors.xml), and styles (styles.xml).
-
mipmap/: Contains launcher icons for different screen densities.
-
-
AndroidManifest.xml: The manifest file that declares app components, permissions, and other app-wide configurations.
-
- main/: This is the main source set for your app. It contains both your Java/Kotlin code and resources.
- src/: The source code folder.
Logs
System logs are the most important information that DDMS can provide. System logs describe all the actions performed by the device, the exceptions that occurred, and the information required for troubleshooting. The logs will appear in the panel named LogCat (do not confuse with Console). Each message in this list is accompanied by the following data:
| Type of message | ||
| I | Information | informative message |
| D | Debug | useful debugging message |
| W | Warning | warning message (exceptions that are not very important and do not have an important impact on the component appear as such messages) |
| E | Error | error message (exceptions that break a component appear as such messages) |
| V | Verbose | additional information displayed by the programs (generally on request, they are used to detect problems generally resulting from misconfiguration of programs) |
| Time | Date and time at which the message was written | |
| PID | The ID of the prosses that generated the message | |
| Tag | Label or category of message (useful for filters) | |
| Message | The actual message |
Example
class MainActivity : AppCompatActivity() {
    private lateinit var firstButton: Button
    private lateinit var secondButton: Button
    private lateinit var editText: EditText

    override fun onCreate(savedInstanceState: Bundle?) {
        super.onCreate(savedInstanceState)
        setContentView(R.layout.activity_main)

        // First method of adding a click listener
        firstButton = findViewById(R.id.btn)
        firstButton.setOnClickListener {
            BUTTON_PRESS_COUNTER += 1;
            Log.d(TAG, "Pressed this button $BUTTON_PRESS_COUNTER times");
        }
    }

    companion object {
        var BUTTON_PRESS_COUNTER = 0;
        var TAG = "MainActivity"
    }
}
Logcat

Exercices
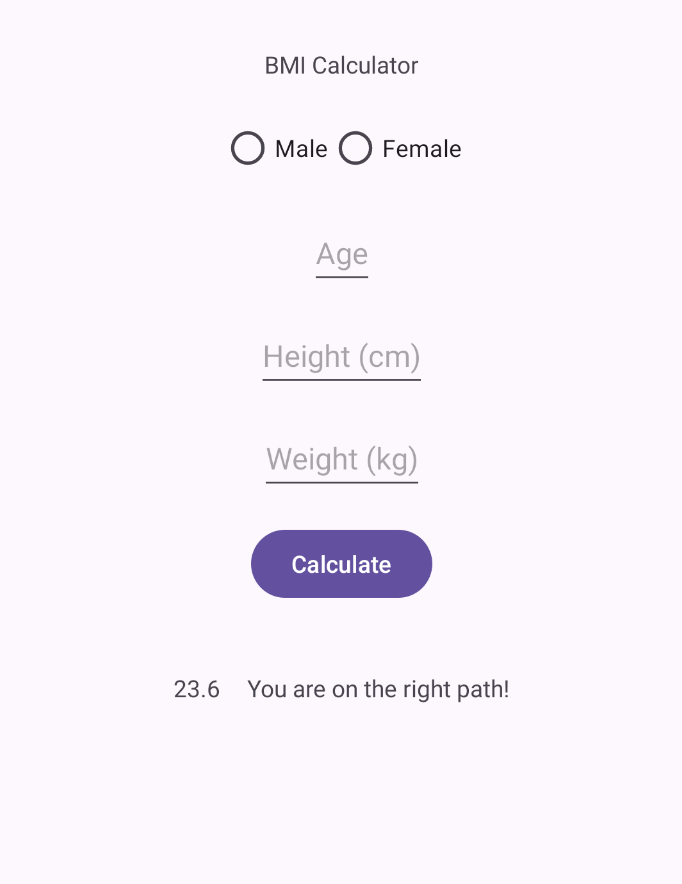
- Use the layout elements explained in the lab to design an
xmllayout looking similar to the one below.

-
Create the
MainActivityfile associated to thexmllayout and bind all the needed elements of the layout (for example: the button might be needed to add a click listener to it). -
In
onCreatefunction, write logs (Verbose,Debug,Info,Warning,Error). View them with theLogcat. -
Add a click listener for the Calculate button that logs all the information entered by the user.
-
Override al the lifecycle methods and add logs on each one. The log message must contain a message specific to the event triggered. For example in the onCreate() callback you can write "onCreate has been called". Run your app and see the order in the callbacks get triggered.
-
When pressing the calculate button, gather all the information from the user and compute the BMI by the following formula
BMI = weight / height_squared. Display the resulting BMI on the screen, along with an indication about the BMI of the user.